How to Make Common Stopper Knots
Stopper knots are used at the end of ropes or cordage to secure whatever they are holding in place. Most of them are very easy to tie, and slight variations exist that are designed to provide specific benefits. Let’s take a look at a few common examples of common knots so that you can make the most use out of them in the field.
Ashley Stopper
Also known as the Oysterman’s knot, this technique provides you with a bulky and secure end that is useful in a lot of different situations. The first step is to fold the cordage in half and pull on the left side until about six inches of rope remains on the right. Push both ends, side-by-side up so that a loop in the shape of a mushroom head is formed. Next, fold the head down so that the center of the top rests above the two pieces of rope that make up the tail. The shorter one should still be on the right. Gently pull on the head so that the loop on the left is larger than the one on the right. Pull the outer edge of the left loop beneath the right string that starts the right loop. Pull it through so it emerges over the right side of the right loop.
Next, take the tail on the right side and pull it through the bottom of the left side of the right loop and out over the top of the right. Bunch the knot you’ve just made between the two loops by gently sliding and tightening it as you move to the left. Pull on the left tail so that it tightens the knot before pulling on both tails until the knot is secure. Trim off the end as necessary.
Overhand Knot
This is probably the most basic knot to make, and it’s a simple way to tie off an end of rope and prevent it from unraveling. It’s the perfect solution for tying and securing things that won’t produce a lot of loading on the rope. Take your rope and create a loop from right to left, with the rope on the left being used for the tail. The tail should be at least an inch or two long as you make the loop. Take the tail and feed it over the left side of the loop you’re making and under the right. Pull both ends, and you’re good to go.
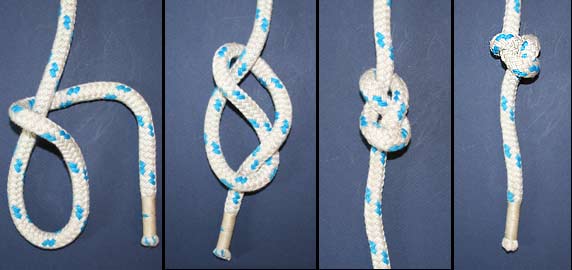
Double Overhand Knot
The double knot adds some more bulk as well as strength to the knot, which is ideal when you need to tie off items more securely. Make the loop as you did in the previous example, but use at least two inches of rope on the tail side. Loop the tail from right to left and feed it over and then under the main rope at the top of the loop on the right side. Loop it over and under again until you have a braid that has four swirls on the right side. When you’re done, the tail rope should emerge from under the last loop and be placed over the bottom of the main loop. Pull both ends until the knot resembles a figure 8 and guide it with your fingers. Pull firmly until the knot locks in place.
The Figure 8
The figure 8 is probably one of the most common stopper knots out there, but it’s worth mentioning here due to its simplicity and effectiveness. The main benefit is that it can hold itself in place under pressure, but it’s also very easy to undo when finished. To make this knot, place the cordage horizontally on a flat surface. Bend up the tail end and fold it back over the main line. Form it into an S shape so the end of the tail sticks out on the top right. Take the tail and place it over the main line to the left so that you have a small loop on the right. Feed the end of the tail beneath the main line on the left side before feeding it through the loop on the right side and pull.
Using the right knots can help you to secure items more effectively while also conserving a lot of cordage.These are just a few examples of dozens of different types of stopper knots that you can create for specific applications. Take time to practice the basic knots outlined here, and then learn more about other techniques that can give you more options out in the field.