How to Make the Easiest Chicken Watering System Ever
There’s no shortage of chicken watering projects out there, and most of them are quite effective. However, many are also more complex than necessary. If you’re looking for a self-watering dispenser for your chickens that’s easy to put together, requires minimal parts and can be assembled in minutes, then the following project is for you. Take a look at the basis principles and see how you can easily incorporate it into your homestead today.
Required Items:
1 food-grade 5 gallon bucket with lid
1 sterilized oil pan or similar container
Drill with a 1 inch boring attachment
Work gloves and protective eyewear
Getting Started
The first step is to make sure that the container as well as pan are clean and sanitized. Keep in mind that your chickens will be drinking any contaminants that may be present on these items, and they can also be passed on to you over the course of time. Try to use new items when possible, and make sure that used ones are properly prepared before using this method.
The next step is to bore a hole in the center of the lid. You can do this while the lid is still attached or by placing it on a firm and level surface. This will serve as a pressure valve once the system is in place and ensure that water is being distributed into the pan properly. Next, mark a series of equidistant spots around the top of the bucket. You want to bore holes about an inch from the top rim and at least a couple of inches apart. Try and center the holes between the rim and the flange. Anywhere from 4-6 holes should be sufficient to allow water to exit the bucket and into the pan that the chickens will drink from.
You can adjust the height of the holes to match the amount of water that you want to keep in the pan. For example, placing the holes closer to the rim will allow you to use pans with shallow walls whereas you can make the holes higher if you are using deeper pans that you want to contain more water.
Putting the System Together
Attach and secure the lid to the bucket and place the drip pan or container in a suitable location. Take a hose and put it through the hole in the lid and fill the bucket with water. Once full, the aim is to quickly invert the bucket and let it rest in the center of the pan just as you would add a big bottle of water to a dispenser. The trick is to keep the amount of water that spills to a minimum as you turn the bucket. The ½ inch hole on top will help, but it will take some practice to get the hang of things. It’s a good idea to put the pan and bucket in a location that won’t be impacted by spillage if you lose a lot of water on your first couple of attempts.
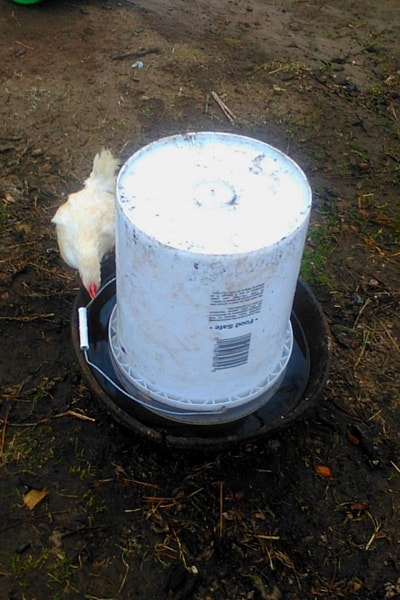
Once the bucket has been inverted and is centered on the pan, the pan should fill up until the water level reaches the top of the holes that ring the sides. The hole that is in the center will help to create a vacuum seal that will prevent the water from overflowing. All you need to do now is keep an eye on water levels and refill as necessary. Thoroughly clean the drip pan during every refill to remove any gunk, grime or debris that can contaminate the water supply.
The biggest consideration when using this method is that you need a drip pan that’s large enough to give the chickens room to drink. It should have a diameter that’s at least an inch or two wider than the bucket so the heads of the chickens can have room to move. You also may want to consider making more than one dispenser if you are dealing with a lot of chickens in order to avoid overcrowding. Try this trick out for yourself, and see how this is one of the easiest and most effective water dispensing systems that you could ever make.