How to Build a Simple but Effective Yukon Stove
(Start video at the 2 minute mark)
A Yukon stove is a variation of the more well-known Dakota fire pit. It is very easy to construct, and you can build a fire that is more resilient against the elements. It also gives off minimal smoke and light, which makes it a good fire to know how to build under certain circumstances. Take a look at the ideas behind the following example, and see how easy it is to build this specialized fire.
Preparing the Pit
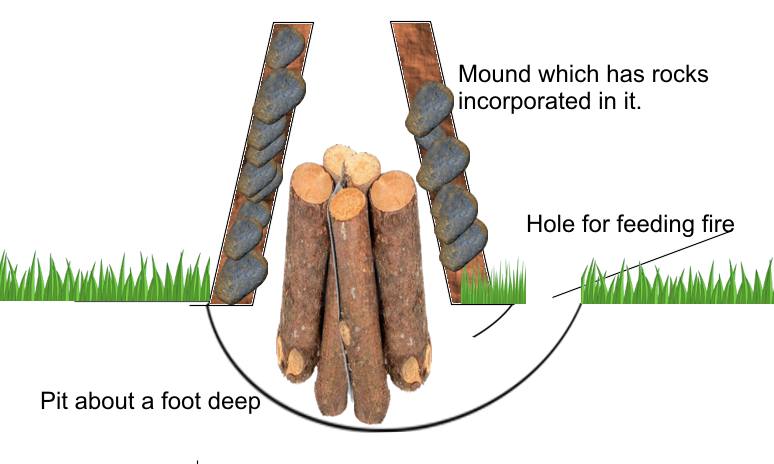
The first step is to dig a pit that’s around two feet in diameter and a foot deep. Some people recommend digging out the hole in a bowl shape whereas others think that a normal trench is fine. Try both versions to see how it impacts the temperature of the fire, because airflow dynamics are different under each setup. In any case, you want the pit to be big enough to contain most of your fuel. You also need to dig out a side channel that angles in from the ground about a foot away from the main pit. This hole will connect to the side of the pit and introduce oxygen into the fire.
You should also have some kindling material or forest debris on hand in order to cover portions of the hole in order to regulate oxygen flow and temperatures as well. A lot of the control that you will have over the fire will depend on how well you can regulate the flow of air into the system.
Building the Mound
The next step is to build your fire, including the ignition source, tinder, kindling, and medium-to large branches. Then, you want to build an earthen mound that will cap off the fire. This cone will have a hole in the top where smoke and heat can escape. You can use any material that you like to build the cone. However, you want to use a lot of rocks as “bricks” in order to take advantage of their heat-absorbing properties.
Make a mud/clay/debris pack with these rocks and other appropriate items, and start building it a few inches away from the edge of the pit. You can also make a tepee out of sticks in order to serve as the structure of the frame as well. Ideally, you want to fashion the cone to be as heat-absorbing and sturdy as possible. This way, you can lift it and feed the fire as necessary. You can also build another access tunnel or make the pit wider on one side in order to stoke the fire and add wood. However, you will need to build some type of cover that will trap the heat and smoke inside and force it through the cone.
Efficiency
The good news is that this type of fire is extremely-efficient. It will trap heat, making it warmer while using less fuel. Regulating the flow of air will give you more control over the burn rate as well. Finally, it can still work when it’s raining or windy. You can also extinguish the fire by plugging the vent hole as well as the top of the Yukon cone. This allows you to use the fire later without having to build a new one.
Try it for yourself, and pay particular attention to the types of rocks you use. Smooth rocks tend to attract and radiate heat pretty effectively. Also, play with different sizes and cone designs in order to get a sense of what you would need to construct in a real-world situation. In any case, this is another simple skill that you can learn and put in your bushcraft bag of tricks.