How To Build a Hydroponic System from Coffee Containers
Hydroponic growing systems can be as simple or complex as you want, and you don’t need a lot of resources or experience to get started. If you have a plastic coffee container, some common parts and a little bit of ingenuity, you can built your own system and start to take advantage of this awesome growing method. Look at the steps below and see how easy it is to grow plants without soil.
Preparing the Container

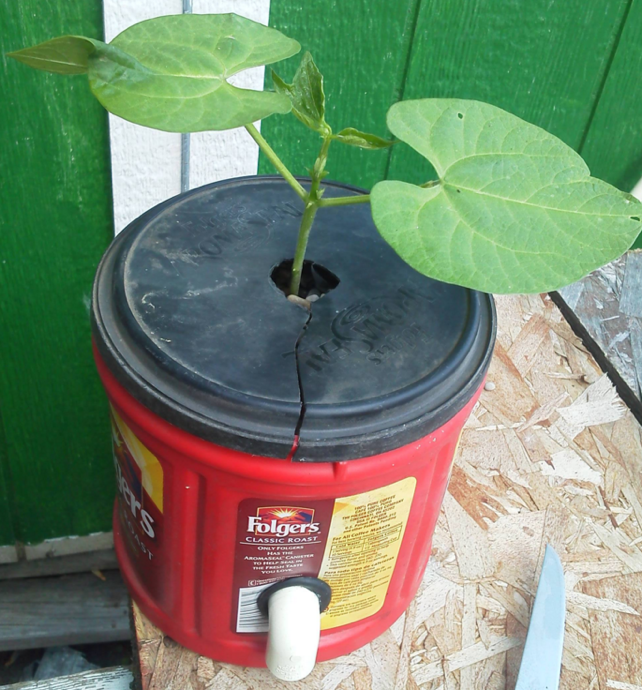
Rinse out the container and then drill a hole that is an inch in diameter about 1½ inches from the bottom. Insert ¾ inch rubber grommet to provide a seal around the hole. The next step is to take one ¾ inch PVC elbow joint and feed it through the outside of the hole. Make sure that the elbow is facing down. Take a 2-3 inch long piece of PVC pipe that is ½ inch in diameter. Attach it to the elbow from the inside of the container. Attach another ¾ inch elbow to this pipe and make sure that it is also facing down.

Fill the container about ¾ the way up with the growing medium of your choice and insert the plant that you want to grow as you pour the material. Pea stone works well because it’s not too expensive, but there are many options out there to consider. You can use any size container as long as they are made from sturdy plastic, and coffee ones work best. Just remember that you will need more growing medium for larger containers. Cut a hole in the lid of the coffee container that is also about an inch in diameter and fit it over the plant. Cut some gashes that extend outward from the hole for additional space if necessary.
Preparing the Irrigation System

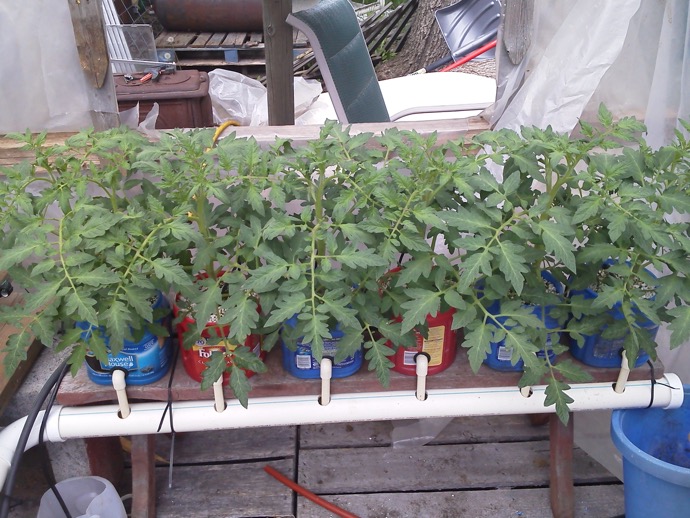
The easiest way to create the irrigation system is to use a ½ inch main line that is attached to your water pump. You can use a simple aquarium pump for most starter systems. Attach the main to the outflow valve of the pump and place it along the row of containers you are making. Take ¼ inch poly tubing that has a barbed coupling on one end and stick it into the main line. You can use a hole punch, nail or big screwdriver to make a starter hole for this connection. Once the feeder line is attached to the main, simply stick the other end into the growing medium.
If you are working with multiple planters, you may want to consider using a 1-2 inch diameter PVC pipe for the drain line. Make the pipe as long as the row of containers. Cap off one end and place an elbow joint on the other where water can drain into your reservoir. Make a closed-loop system by inserting the inflow tube from the pump into the reservoir.
The next step is to bore holes into the drain pipe that align with the elbow joint you’ve made on the container. Attach a couple of inches of ½ inch diameter PVC pipe to the bottom of the elbow and fit it through the hole in the drain pipe. Repeat for all planters.
All you need to do now is to run the system and check for leaks. Chances are that the connections will be tight enough without the need to use epoxy or sealant. However, if you do encounter a leak, simply seal it up and you should be good to go. Add some nutrients and allow the system to run. Make sure to change the water frequently to ensure the plants are not getting supplied with water that contains too many impurities and waste products.
You will need to do some research in order to learn about how to grow specific crops hydroponically as well how to find the right balance with nutrients and water quality. The water will need to be filtered and changed periodically, but there are a number of easy ways to take care of your system that you can learn about over the course of time. This project is a simple and affordable way to get started with hydroponics, and you will discover the benefits of using this growing method as you learn more over the course of time.