How to Perform an Emergency Tracheotomy in the Field
A tracheotomy is an emergency medical procedure that is used when a patient receives a trauma to the throat and the trachea, or windpipe, becomes obstructed. It is a relatively simple procedure, but it also involves a lot of risk to the patient. Consequently, even paramedics are not always allowed to perform a tracheotomy in certain parts of the country. However, it is an important technique to know about in case you encounter a life or death situation and professional help is not available.
When to do a Tracheotomy
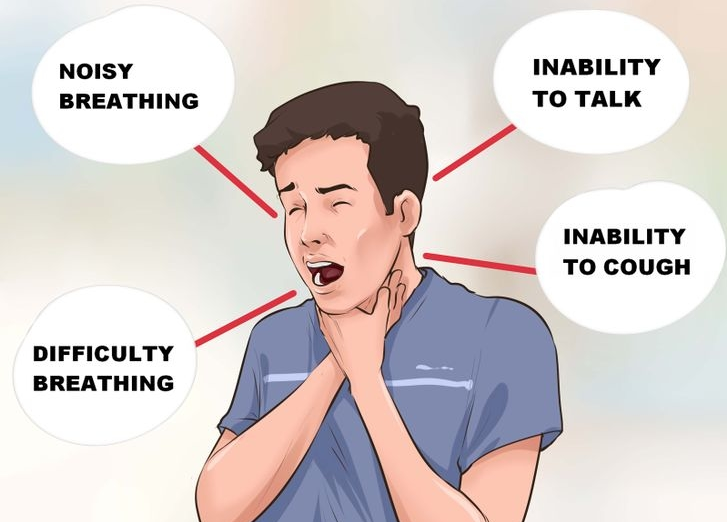
The tracheotomy is only used in situations where the patient cannot breathe because their mouth or upper throat is obstructed by blood, cartilage, swelling or foreign objects. It is not meant to be used for respiratory arrest or obstructions that are below the Adam’s apple. Consequently, it’s important to assess the nature of the trauma before deciding to use this last-ditch procedure.
Finding the Spot
You are looking for a soft spot of tissue between the rings that make up the larynx in the center area of the neck. For men, the first step is to locate the Adam’s apple. In women, there is still a small bulge, but it is less-defined. In both men and women, the area around where the Adam’s apple should be is called the thyroid cartilage. Gently run your finger down the windpipe for about ½ to 1 inch until you come across another, smaller bulge. This is called the cricoid cartilage. The soft tissue between the two bulges is where you will make your incision.
Getting Started
The first step is to lay the patent down and gently arch their neck and head up and back. This will expose the trachea and make it easier to identify the location to make the incision. It also makes it easier to perform the procedure as the skin around the windpipe will be stretched. Make sure the patient is not breathing and try a couple of rescue breaths to see if the chest rises or falls before deciding to continue.
Making the Incision
Once you’ve located the soft tissue, take your scalpel, razor blade or even sharp, small knife and make a ½ inch long horizontal incision. You will need to apply enough pressure to cut through the skin and tissue in one pass, but not too much that you end up deforming or shattering the windpipe in the process. Unfortunately, most of us who would be doing this procedure will probably not have an opportunity to practice beforehand. Aim for a cut that is also about ½ inch deep, and hold the blade in your hands in a spot that limits how deep it can be inserted.
There should not be a lot of blood after you make the incision, and you can quickly use some gauze or clean fabric to wipe the area before continuing on to the next step.
Inserting the Tube
The next step is to quickly insert some sort of tube into the incision so that air can be delivered to the patient. You can use anything from aquarium or surgical tubing to the sheath of a disposable pen. It should be smaller in diameter than the incision you made. You may need to wiggle it into the cut in order to expand the surrounding tissue enough to stick it inside the windpipe. Place the tube between ½ to 1 inch down so that it rests in the center of the windpipe and not the backside. Otherwise, air may not be able to pass through.
Gently blow into the tube or use an airbag and look to see if the chest rises or falls. If not, re-position the tube and try again. In most cases, this will work unless swelling, obstructions or other barriers in the upper respiratory tract are present. Once you have identified that the lungs are filling with air, try and secure the tube to the throat with a few pieces of tape. This will prevent accidental movement and the potential to scrape or cut the inside of the trachea. You also want to cover the area with some gauze or bandages to prevent any debris or impurities from getting inside as well. Covering the tube will also create a seal that allows most of the air to enter and leave without leaking.
There are a long-list of risks associated with this procedure, which is why it should only be done as a last-ditch effort to save someone’s life. It is also important to use sterile material as much as possible, but chances are that you won’t have time if you need to resort to this during an emergency. However, you can make sure that your blade as well as tubing are as clean as possible in order to minimize the chances of the patient getting an infection.
The last thing is to evacuate the patient and get them to a hospital or ambulance as soon as possible. A tracheotomy is meant as an intermediate step that buys time for the patient to breathe during a trauma. However, ample oxygen will not be delivered to the lungs, and the patient’s condition can quickly deteriorate even with this form of intervention. Consider sending someone out to get help or blaze a trail for everyone to evacuate at the same time that you start this procedure. This will reduce the amount of time that the patient has to wait before getting appropriate medical attention.